
Why we chose wood-fired pizza oven from Kiwi Pizza Oven.
We chose a wood-fired pizza oven from Kiwi Pizza Oven because you can’t beat the quality that goes into hand-crafting an authentic wood-fired pizza oven. Ovens of this quality can not be mass-produced, a machine does not have the expert eye to observe throughout the construction process and make decisions if more time or materials are required. Machines also do not allow for such options when it comes to customisation.
I’ll admit at first, I lacked knowledge about wood-fired pizza ovens, I especially didn’t know what to look out for when purchasing one and how to tell the quality of ovens that looked similar apart. I was looking for a pizza oven that was going to help create a beautiful outdoor entertainment space, make entertaining easy, be durable, built to last, and be versatile in what foods it could cook. Based on these criteria it was going to be important for me to look into heat retention, durability and ability to customise my oven to suit my outdoor space.
There were a number of wood-fired pizza ovens on the market to choose from. They all came with different price tags and different appeals. The cheaper pizza ovens were able to heat up quicker but they wouldn’t maintain their heat and required more wood and attention, which can become costly and annoying when you are trying to entertain family or friends. While the pizza ovens that were balanced and insulated well took a bit longer to heat up, they retained their heat for a lot longer, required less wood, and were versatile in the foods that you could cook in them during the cooling down period.
I spoke with Pawel to learn all there is to know about choosing an authentic pizza oven, what to look out for, how to tell if it’s made of good quality and what are the important questions you need to ask to ensure you invest in not only a beautiful oven but a well-built oven.
Heat retention:
Heat retention is one of the most important signals of how well your pizza oven is built. If the pizza oven does not retain heat, it cools down quickly and requires lots of wood to remain hot, this is an indication the pizza oven has not been well insulated.
A poorly insulated pizza oven is going to become a hindrance when entertaining, it will require you to pump out as many pizzas as you can while it is hot, instead of taking it at a leisurely pace with friends and family. It’s going to use a lot more firewood to maintain the temperature and this will require constant monitoring during the period that you intend to use the pizza oven.
A well-insulated pizza oven has a gradual cooling process, taking 10-15 hours to cool down. Is versatile in the foods that you can cook while it slowly drops the temperature and does not require a lot of attention while entertaining, just the odd log of wood.
Durability:
A well-built pizza oven isn’t going to be built from a range of materials. Different materials have different thermal expansions, and the use of a lot of different materials can cause the pizza oven to crack. When a pizza oven cracks, this increases the risk of water getting into it and damaging the oven. A key we learnt during our pizza oven journey was to ask what materials the pizza oven has been made from.
With Kiwi Pizza Oven, they are made up of 10 layers of the different selected types of materials for distinct purposes. This reduces the risk of the pizza oven cracking and gives adequate insulation with 10 layers.
- Heat Core (1 layer) - Refractory concrete: accumulates the generated heat and radiates it inwards for even cooking.
- Insulation (2 layers) - Flexible insulation: withstands extreme heat preventing heat loss. Rigid insulation: provides additional structural support and thermal resistance.
- Crack Prevention System (4 layers): advanced materials and reinforcements that flex slightly absorbing thermal expansion adding tensile strength and smooth surface.
- Waterproofing (1 layer) - impenetrable barrier to protect the insulation and inner layers from moisture damage.
- Finishing (2 layers) - textured layer (optional) - provides a decorative finish. Paint (at least 3 layers) - durable paint that protects the outer surface and gives the oven its final colour.
Customisation:
Choosing the colour, tiles and style of my pizza oven was a very important factor in deciding which pizza oven to choose. I did not want the oven to stick out and look out of place in my backyard. This customisation allowed me to tailor the oven to my surroundings and add value to my home and outdoor entertainment space.
I chose an almost black outside colour with a Mediterranean texture effect and a dark chocolate colour Italian ceramics brick style front. Pawel offered the ability for full customisation and if there were tiles that we wanted, he would source these for us.

Did I consider the DIY kits?
I did consider the DIY kit for a brief second but after my experience building the pizza oven stand which I will mention, I am glad I did not take this option. Despite the easy-to-follow instruction and assurances from Pawel that anyone, even those without skills, would be able to follow the instructions and build it like “lego blocks”. I chose to have Pawel build my pizza oven instead. I chose this because Pawel is an expert in his craft, he has built countless pizza ovens and I don’t think I would be able to build something as perfect as what Pawel would be able to deliver.
I decided, if I’m going to purchase an authentic pizza oven, you may as well pay the extra to get the best job done possible.
How long did it take for the pizza oven to be built?
I was lucky and the build only took Pawel 2.5 weeks. However, I was informed the build time will heavily depend on Pawel’s order log but it couldn’t be faster than 2 weeks due to each pizza oven taking 100 hours to make. It requires the right drying time between each layer and needs time to set before picking up and moving to my location.
What you need to know for delivery - do’s and don’t
When it comes to delivery, preparation is key. You want to ensure you know exactly where the pizza oven is going, the stand is going to be able to hold the weight and it’s accessible for the delivery people. What is really great about the Kiwi Pizza Ovens, is they have their own self-supporting base. This makes the bench top and stand options endless. Whereas others on the market that we looked at needed specific stands built in order to bear the weight of the pizza oven.
I chose to organise delivery myself. Alternatively, if needed, Pawel could have handled this on our behalf, showcasing exceptional service.
Something to keep in mind when lifting the pizza oven is there is a significant amount more weight in the front of the pizza oven due to the entrance and chimney. We found that when lifting the oven, it wanted to tilt towards the front, so making sure the straps are appropriately placed to account for this is extremely important as once you lift it, if the pizza oven goes, you do not want to be under it. It also meant that we had to lift the oven higher than we had initially planned but Pawel’s lift that we borrowed could easily lift high enough.
It’s recommended to use professional movers in this instance if you are unsure about this; however, Pawel is more than happy to explain the process and how you should go about moving the pizza oven if you become stuck.
Building the stand
Attempt 1
Despite not having a shred of DIY in my DNA, I decided to embark on the task of building a pizza oven stand. Next time, I would 100% purchase one pre-built from Pawel instead…
Here’s what I learned during the process:
- We bought wood from Bunnings that had been sitting outside and was damp which meant the combination of lower-quality of wood and rapid drying in the sun caused lots of cracking.
- We used 100mx100m wood and notched out 50mm into the legs for the horizontal beams but realised that this should have only been 25mm. This mistake removed 75% of the structural integrity of the legs where we made notches
- The pizza oven stand was rushed because we had not given ourselves enough time to make the stand before delivery. We didn’t realise the attention to detail and time to ensure everything fit together correctly, especially because we didn’t have the luxury of the expensive tools to make the job easier.
- We did not have a good measurement of the pizza oven and therefore did not account properly for the size of the pizza oven. When it got delivered we had to rush and make some alterations to cut small bits off the top of the stand. In our haste we cut a notch off the top left leg but didn’t not do the same to the right. This resulted in the pizza oven being placed on the stand further to the right and not distributing the weight evenly across the 4 legs. This uneven pressure on one side of the pizza oven resulted in a fair bit more strain and more noticeable cracking.
Attempt 2
We made a second stand encompassing everything we had learnt, below are the main points.
- Make the stand a few weeks prior to delivery/make sure there is enough time to get the stand prepared
- Source good quality wood
- Use the dimensions of the pizza oven to make the stand (I have added some below for reference)
- Stain the wood to seal it. If the wood is not sealed, the water will enter causing the wood to expand and contract which can cause it to form cracks and split.
- Use longer (150mm vs 100mm) batten screws
- Measure, test fit, measure again, test fit again, and measure again before pre-drilling the holes and screwing the stand together.

Next time, and to anyone interested in a pizza oven stand, I would advise you to instead purchase one from Pawel.
Deciding where to position the oven
Due to the enormous size and weight, I would recommend taking the time to think out how you want to use the pizza oven and what will work best in your space. Taking this time will not only make the set-up easier but will also enhance the experience when using it.
Think about where you will prepare the pizza, making sure there is enough space to lay out toppings and be able to stretch and prepare the pizza. Ideally, this preparation area is in close proximity to the oven so you can easily move the pizza into the oven. Finally being able to move the finished pizza from the oven to the table also improves the experience.
Our first cook, we prepped and ate inside, so had to shuffle in and out of the house which made it a bit more complicated. Having a good prep to oven-to-table flow will enhance the entire experience.
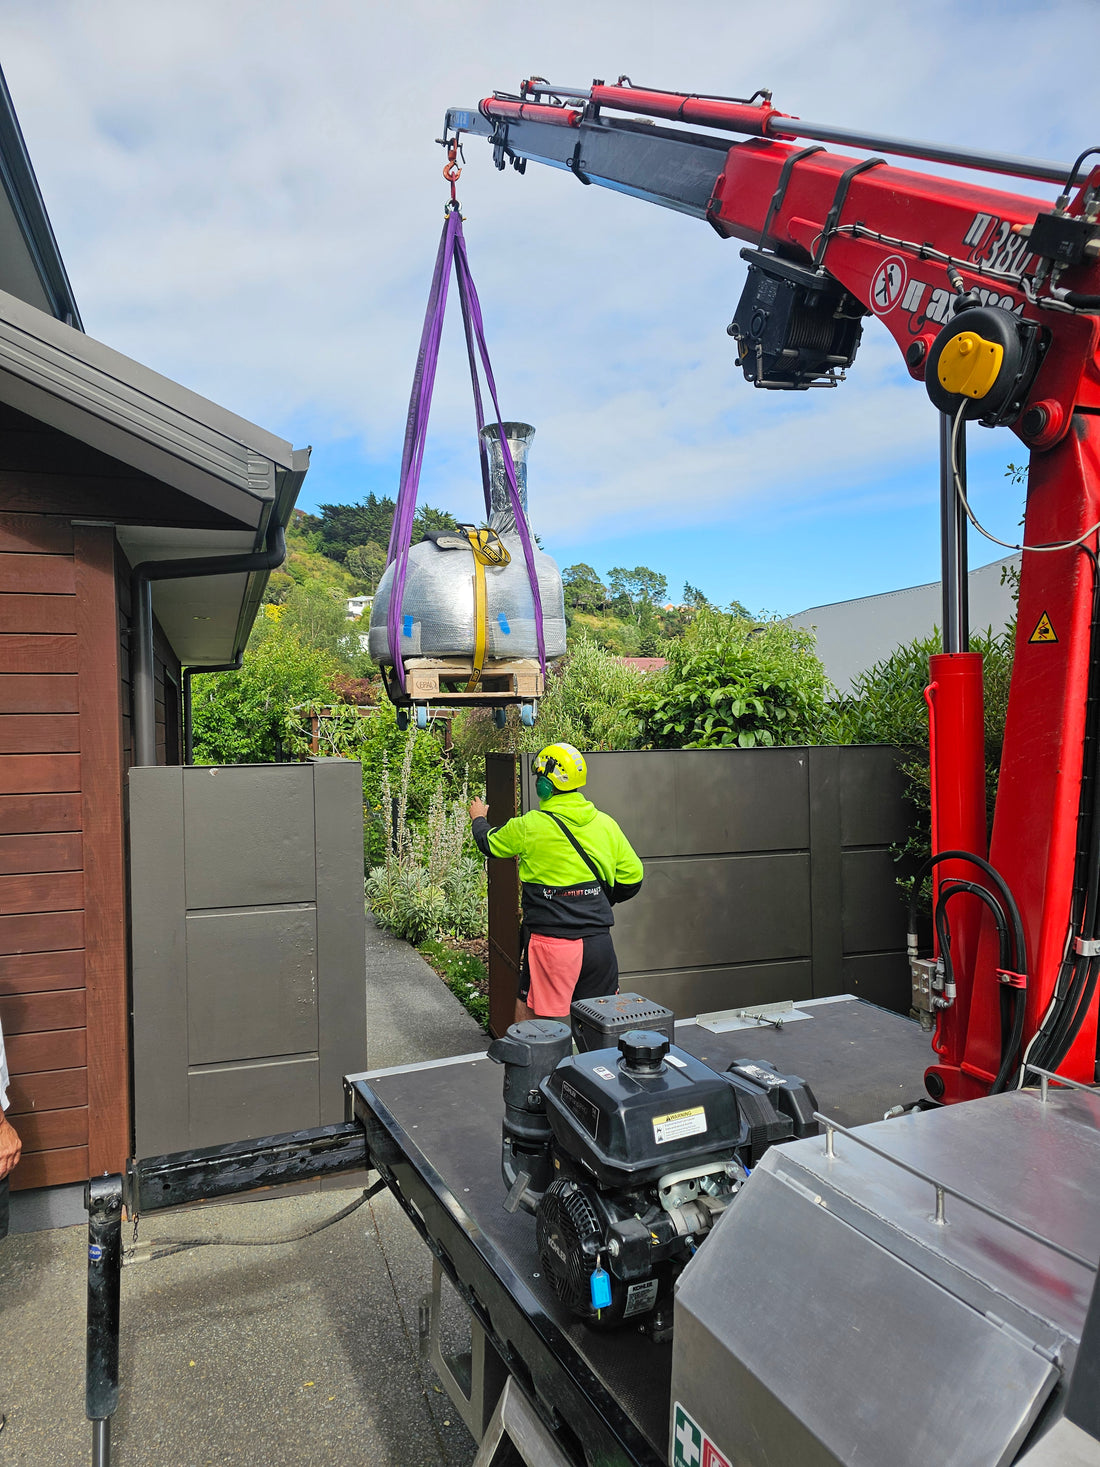
Craning the pizza oven
After building the second and more durable pizza stand we craned the pizza oven over the house. There are a number of things you will want to consider when craning your pizza oven.
- Price (call out fee and time) the location
- How high and far it has to go
- The weight at the extension needed
We had to lift over a single-story flat roof so it required a large truck with a built-in crane to reach over the garage and 5m into the backyard where we had set the base up. This crane had the ability to lift items up to 1 tonne at 25 metres extension.


Unwrapping the pizza oven
Unwrapping the pizza oven was an exciting experience. We got it straight after it had been pre-cured so it was still warm inside. Curing is the process of removing the water from construction. Curing the pizza oven before using it is essential to ensure its longevity.
If the water is not allowed to slowly evaporate from the oven, it can heat up too quickly, which causes the water to boil and let off steam, the pressure from this steam causes cracks in the pizza oven.
Curing the pizza oven was not something I was looking forward to as I did not want to do the process wrong as Pawel had mentioned curing is essential to get right. Curing the pizza oven was not a difficult experience like I had anticipated.

Our experience curing the pizza oven:
As mentioned above, curing the pizza oven is one of the most important tasks to ensure the longevity and life of it. Buying a pizza oven is an investment, so you need to look after it.
Day 1 Curing:
The first day of curing we used fire starters with coal briquettes as these were very easy to maintain and because they were all the same size it was a very predictable source of heat. We slowly built up the fire by adding more coals to the fire until we were around the 90-120 degree range. Once we got to this point we just checked on it every so often to make sure the temperature was staying within the range. Using a laser thermometer made gauging the temperature a lot more straightforward, when we would compare the laser temperature to the thermometer on the door, there was a bit of a difference.
One thing we noticed and wasn’t expecting was the water dripping from the bottom of the oven. It was a bit of a shock but once we realised it was part of the curing process it was fine. It also served as evidence that the oven's self-drying system operates flawlessly, effectively removing condensation from residual moisture.
Day 2 Curing:
Day two we started the same way as we did on day one but used a bit more coals and small pieces of firewood to get the temperature up to 150 - 170 degrees.
Again once we got it up to this temperature we checked on it every so often to make sure the temperature was being maintained.

Day 3 curing:
The final curing day was the more intense day with three different curing periods, the first being 4 hours then 2x 1 hour blocks each getting hotter. We started with coals again but as we required more heat we moved to wood. We recommend starting with smaller bits of wood then moving to the larger pieces as the temperature needs to rise.
Once we finished the curing we cranked the heat up, pushed the fire around the edges and made our first batch of pizzas which was extremely satisfying after the three-day curing process.

Cooking Experience with Friends
On the last day of curing, we tried out the pizza oven since it was hot enough. We experimented with two bases. One base used yeast while the other did not. The recipes are below.
Recipe 1:
450g lukewarm water
Two teaspoons of olive oil
One teaspoon of fine salt
900g flour
Recipe 2:
2 cups warm water
2 tsp sugar
2 tsp dry yeast
5 cups flour
2 tsp oil
1 tsp salt
We found for our liking, we preferred the base with yeast however, there was minimal difference between the two. The yeast-less base makes for a great option if you want to quickly make more pizza dough.

We began crafting pizzas outdoors, but as the weather started to worsen, we swiftly relocated the pizza-making setup indoors. Despite the unpredictable weather, we managed to continue cooking the pizzas and it was a very enjoyable experience.
We enjoyed standing around the oven while it cooked fresh pizzas, due to how quickly they cooked it meant we weren’t standing in the drizzle for long and it’s doable to have a pizza party despite the weather. We thought during the winter months the pizza oven might not get much use but after using it in less ideal conditions, we can envision ourselves hosting pizza nights during the winter.
The pizza oven has a capacity of 60 pizzas per hour, despite inviting 10 people over, the pizza oven’s capacity far outweighed what people were capable of eating. The pizza oven can fit 2 medium pizzas in it at a time nicely, while still allowing for room to rotate the pizzas. The pizzas cook in 1-2 minutes. We prepared plenty of dough in advance, preferring to err on the side of abundance. The benefit of this was we could allow our guests to take pizza home, snack on into the evening while entertaining and we had leftovers for lunches the next day.
During the trial run with friends, everyone was thoroughly impressed. They savoured the freshness of the pizzas, praised the light, crispy bases and appreciated the opportunity to customise their flavours. The versatility of the pizza oven allowed for crafting either large pizzas or experimenting with a variety of flavours by making numerous small pizzas. We learned diversifying the sauces is essential: relying on a single base sauce can lead to monotony in taste.
It was amusing to observe our adventurous friends pile on toppings and experiment with flavours, ultimately realising that sometimes, less is more when it comes to toppings, enhancing the overall taste of the pizza.

Our experience with the pizza oven has been nothing short of amazing. It is a remarkable entertainment centrepiece, a unique addition many typically don’t have in their backyard. It brings the authentic taste of freshly baked pizza to the comfort of our home. It allows us to entertain and host large gatherings without preparing a lot of food and for guests to experiment with cooking pizza and make some great memories. Since acquiring the pizza oven, we can’t wait to host more pizza nights. We would highly recommend choosing a pizza oven from Kiwi Pizza Oven.
Article by Karen R - customer.